Archive for May, 2012

Hello peolez,

    Today, I will show u how to make a iso cd/ dvd using power iso.

    I know that itz very common thing that how u can make a cd/dvd image but than also i got an easier way to make it as simple as possible juzt using with POWER ISO.

Make ISO file using the main program:

    • Run PowerISO.

    • Click “Copy” button on Toolbar or choose “Tools > Make Image File from CD / DVD” Menu.

    • PowerISO shows ISO Maker dialog.

    • Choose the CD / DVD driver which holds the disc you want to copy.

    • Choose the output file name, and set output format to ISO.

    • Click “OK” to make iso file from the selected disc.

Usage2: Make ISO file using the shell context menu:

  • Open “My Computer” and select the drive which holds the disc you want to copy..

  • Right-click on the drive selected, the shell context menu will popup.

  • Choose the menu “Make Image File”.

  • The “ISO maker” dialog will display.

  • Choose the output file name, and set output format to ISO.

  • Click “OK” to start making.


————————————————————————————————————————–

*******************************************************************
Hope it will be helpful 4 u…
*******************************************************************
————————————————————————————-———————————–
PaRaMzZZ… 
———————————————–——–ThankzZZ…———————————————–


Hello people,

Today, I will show you how to make a bootable USB flash drive. It is very essential to know to make a bootable USB flash drive (Pen drive, External hard disk etc.). Because sometimes it may be your DVD/CD RW drive does not work, or you are using mini laptop and you have no DVD/CD RW drive. In this situation if you want to change or reinstall your operating system, you should to know how to make a bootable USB flash drive. For this you require image file of an operating system, an USB flash drive and ‘Power ISO’ or ‘Novicorp Win To Flash’ software.

Using Power ISO Software :

  1. First install Power ISO software.
  2. Keep the image file of an operating system into your hard disk or anywhere.
  3. Connect an USB flash drive (Pen Drive).
  4. Open Power ISO and go to tools and click on Create Bootable USB Drive.
  5. Select the Image file as Source Image File. Set your USB flash drive (pen drive) as Destination USB Drive and click on Start button. It will take a few minutes.

Power ISO software : Download
Using Novicorp Win To Flash :

    1.  Open ‘Novicorp Win To Flash’ folder and click on Win To Flash application software.
    2. Now click on Task and select Task type.
  • Transfer WinPE  XP/2003 to USB drive
  • Transfer WinPE Vista/2008/7 to USB drive
  1. Click on Run. Select PE files source path (.iso Image file source or CD/DVD source path) and USB drive (Pen drive or other USB flash drive path). Now click on Run.

Novicorp Win To Flash software : Download

Now you can use your USB flash drive as like as an optical hard disk drive (CD/DVD).

If you use USB flash drive instead of optical hard disk drive (CD/DVD) you need to change Boot Option from BIOS Setup Utility. From Boot Order option set USB Hard Disk as your 1st choice.

Set ur 1st Choice to be USB Hard Disk…
 

———————————————————————————————————–
*******************************************************************
Hope it will be helpful 4 u…
*******************************************************************
———————————————————————————————————–
PaRaMzZZ
———————————————–ThankzZZ…—————————————–

There are many occasions when you would want to create an ISO image.  for example, when you want to  create an exact copy of a disk, you create an ISO image, when you modify a bootable CD, you create an ISO image, etc. in this article I will discuss the easiest and quickest way to create an ISO image.

Most CD/DVD burning software support ISO image creation, but if you use windows XP, Vista or Windows 7, you probably already know that it supports native CD/DVD burning, so we only need to add the ISO creation capability by downloading a plugin.

open your browser and go to ISO recorder and download the plugin (power toy) for your Windows version. click on the .MSI file to to launch the setup wizard:

ISO recorder wizard

the installation should be straightforward, just click Next on all windows.

once you have installed the ISO recorder power toy, right click on any directory you want to create an ISO image of, and you will see the option to create an ISO image from the right-click menu:

Create an ISO image

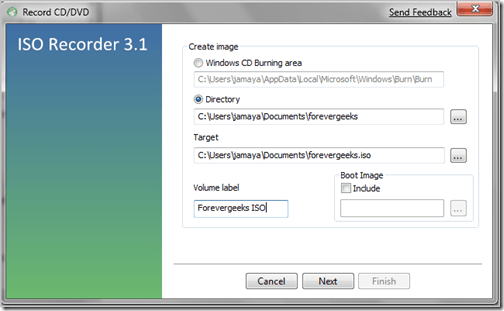
The Create ISO image window will come up:

ISO Recorder

Basically, you can just click on the Next button here, but if have time, add the Volume label name, and choose the directory rather than the default where to save the ISO image.

you will find that the ISO image has been created:

ISO image

now if you right-click on this ISO image, you can easily burn it to a CD or DVD by choosing the option to Copy image to CD or DVD from the menu:

copy ISO image

from there on just insert a blank CD or DVD and click on next button to burn it.

that’s it. that’s how simple is to create an ISO image on windows XP, Vista or 7.

———————————————————————————————————–
*******************************************************************
Hope it will be helpful 4 u…
*******************************************************************
———————————————————————————————————–
-PaRaMzZZ…
———————————————–ThankzZZ…—————————————–

I got a great pleasure to showing u that how u can easily make a ISO image from your CD or DVD in Ubuntu.
Ubuntu makes it easy to create an ISO image from your CD or DVD.

1. Insert the CD or DVD that you want to make an ISO image of.
2. Open a terminal window.
3. Execute the following command:
——————————————————————————
cat /dev/scd0 > /home/paramzZZ/test.iso
——————————————————————————

where /dev/scd0 is the device name for your drive (to find this, go to the Main Menu, click on System, mouse-over Administration and select System Monitor. Click the File Systems tab. The device name will be listed in the Device column). Also make sure to change the path and iso filename to the desired path and filename.

The disc will begin to spin and the ISO image will start being constructed. Once it has completed, you have an ISO image of your CD. To verify that the image was properly created, mount the ISO file and check the contents.

———————————————————————————————————–
*******************************************************************
Hope it will be helpful 4 u…
*******************************************************************
———————————————————————————————————–
-PaRaMzZZ…
———————————————–ThankzZZ…—————————————–